Entri Populer

Selasa, 02 Oktober 2012

CONFIGURE SAMBA SHARING BETWEEN UBUNTU AND WINDOWS (SCREENSHOT TOUR)


Install Samba on Ubuntu 12.04/11.10/11.04/10.10/10.04/Linux Mint/other Distro's and share files with samba from Ubuntu to Windows and Windows to Ubuntu

I wrote tutorials on samba sometime ago but some peoples found that is not useful for them or the method couldn't work properly for them, I also made video on samba sharing.

Now I made complete tutorial on samba configuration to share you data from Ubuntu to Windows and also Windows to Ubuntu, Its mean you can access your Ubuntu shared data from Windows and Windows Shared data from Linux Ubuntu with/without permissions. Permission is up to you, if you want to set permission or not.


Install Samba on Ubuntu/Linux Mint open Terminal (Press Ctrl+Alt+T) and copy the following commands in the Terminal:
  • sudo apt-get install samba samba-common
  • sudo apt-get install python-glade2
  • sudo apt-get install system-config-samba

I made this tutorial on Ubuntu 10.04 LTS and Windows 7, It is working on all Ubuntu versions and all Windows Versions.

Method 1: How to access Ubuntu/Linux shared data from Windows
Method 2: How to access Windows shared data from Ubuntu/Linux

>> First of all How to access Ubuntu Shared Data from Windows.

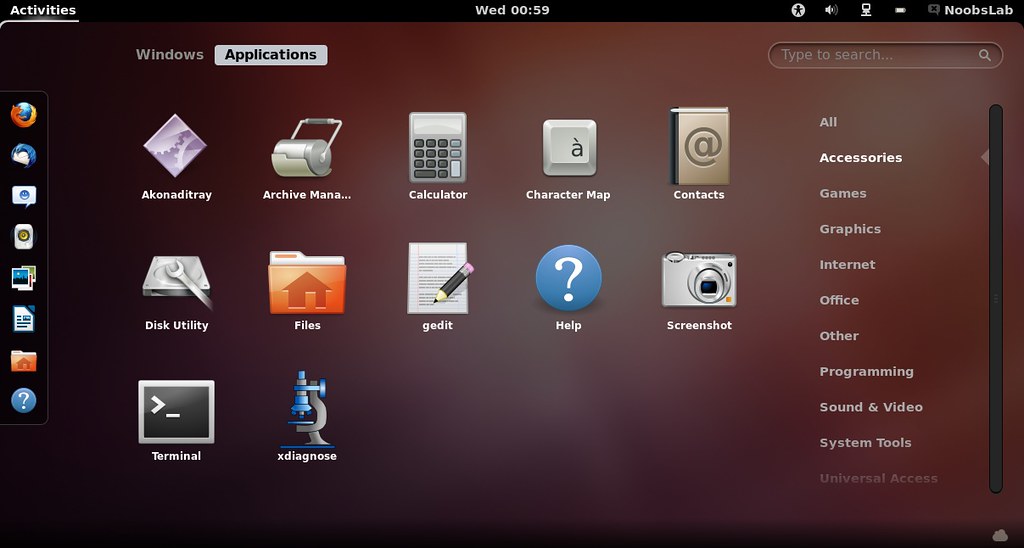
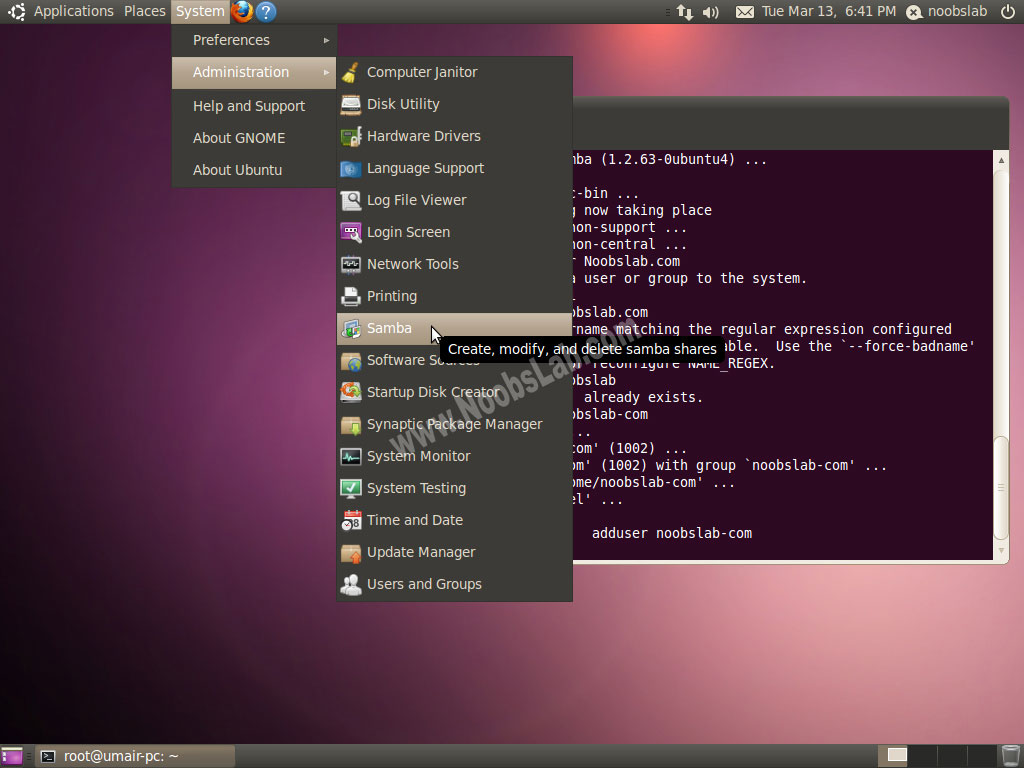
Now go to Dash and search for 'Samba' than open it. As shown in picture.


samba

When Samba Server Configuration open, Click on 'Add +' button than click on browse >home >select user.

Ubuntu samba

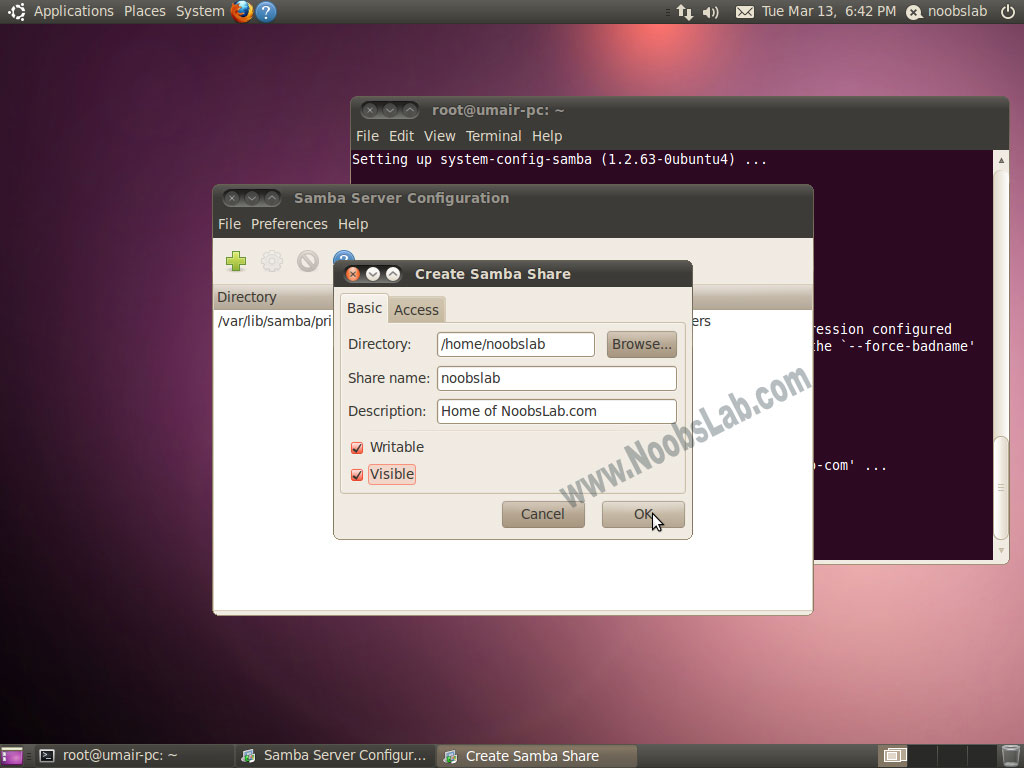
Now go to 'Access' tab and select username from which you want to access sharing.

linux samba

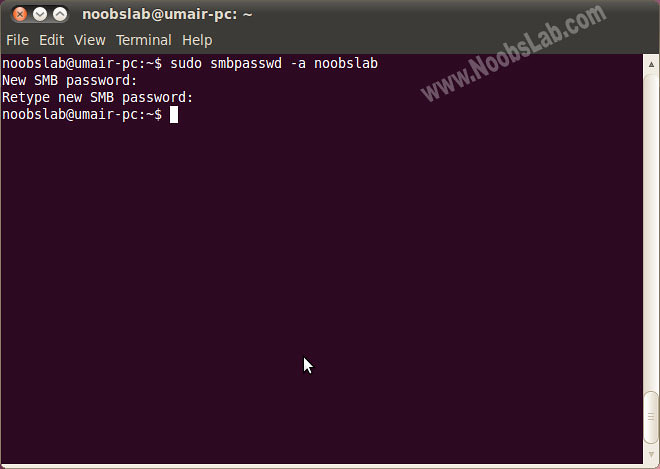
Now set password on your selected username for samba sharing. Enter following command to set password (change noobslab with your selected username).
  • sudo smbpasswd -a noobslab
mint samba

Now right click on Folder which you want to share on network, than select 'Sharing Options'

Windows samba

Here is Folder Sharing options, You can choose and write whatever you want to do. Than click on 'Create Share'

install samba

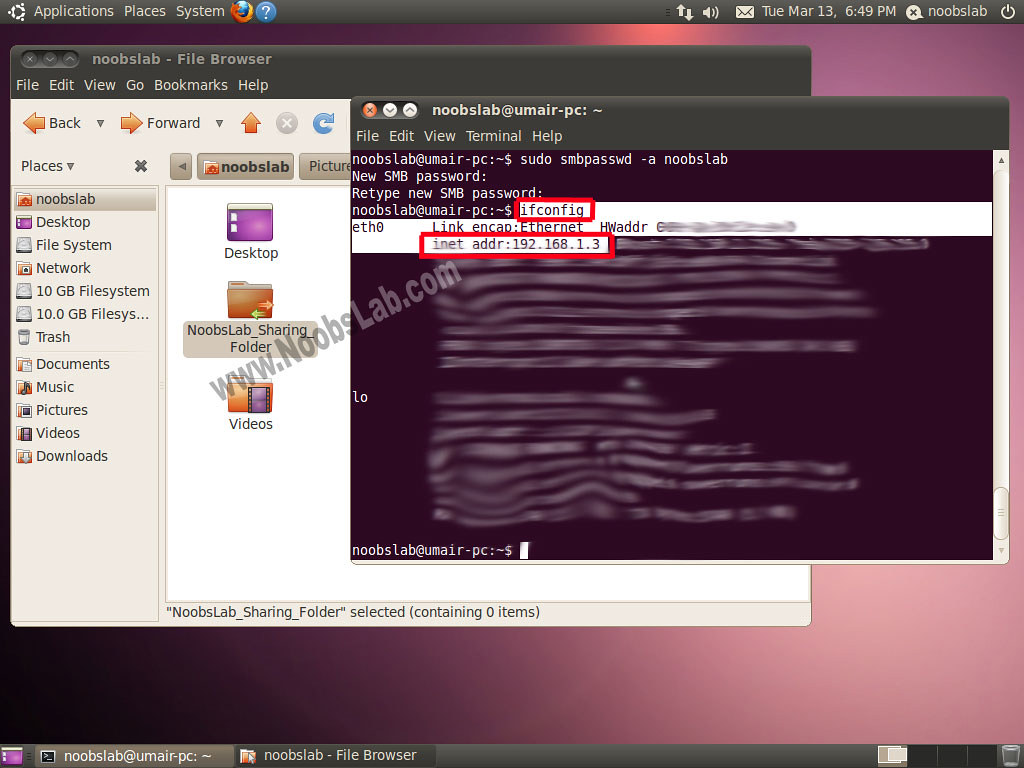
Now open Terminal and enter following command to know your local network ip. (See the picture below and see red marks)
  • ifconfig
Note your Ubuntu/Linux Machine IP Address

samba

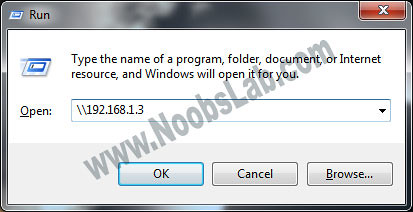
It's time to access your sharing on Windows, Now go to start and open 'Run' than enter ip with double backslash. Like this (\\192.168.1.3)

samba sharing

Now sharing will open, Now click on shared folders than windows will ask for samba username and password. You can share without username and password it's up to you.

samba

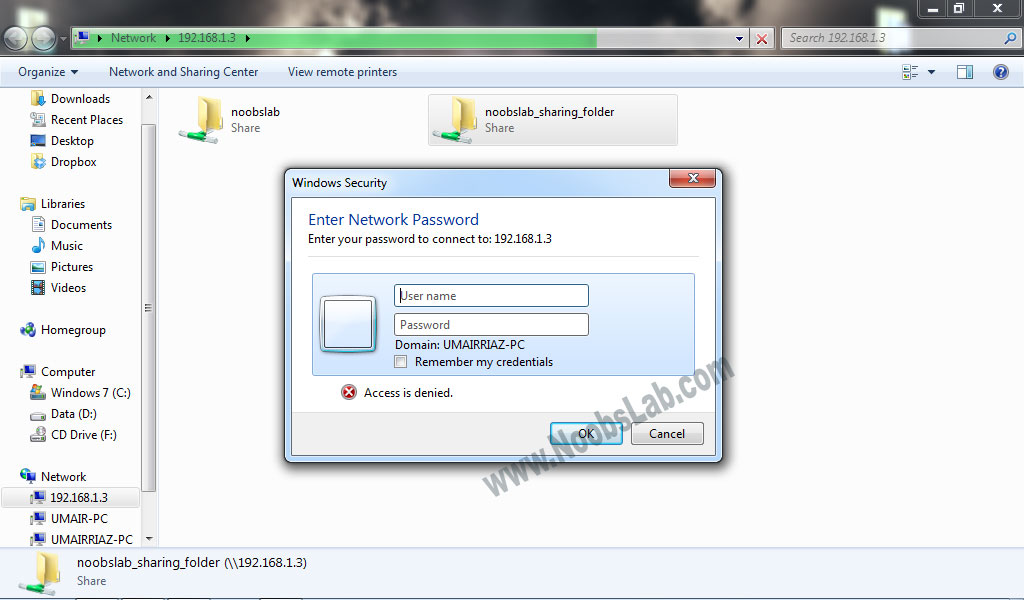
When you enter the username and password your shared folder will open. You can write/delete/modify whatever you want to do (It's up to your permission implementations).

samba
That's it.


>> Second How to access Windows Shared Data in Ubuntu

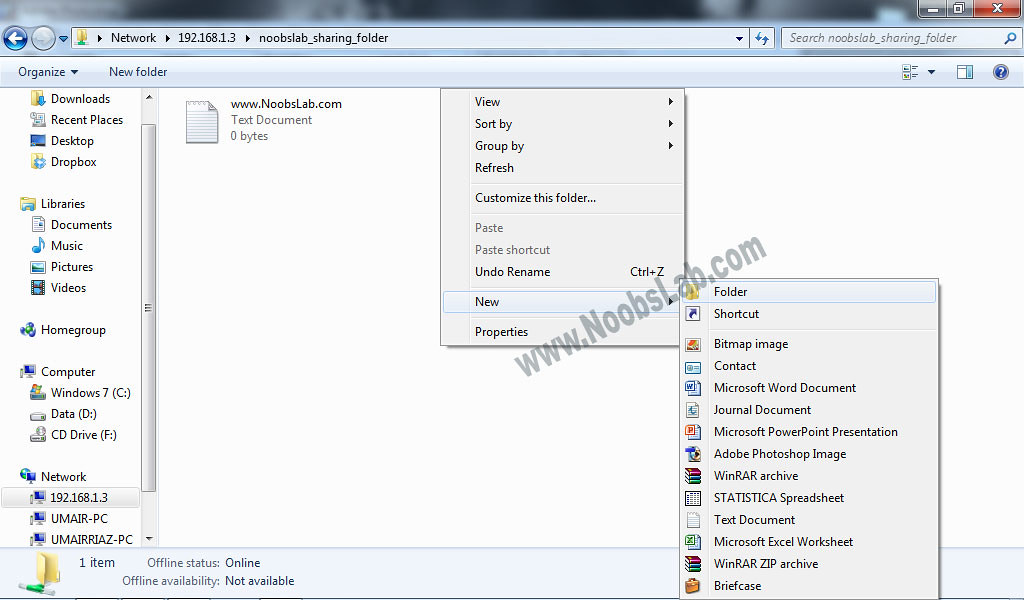
In Windows right click on folder which you want to share on network, Than click on 'Advanced Sharing' or 'Sharing'.


share samba

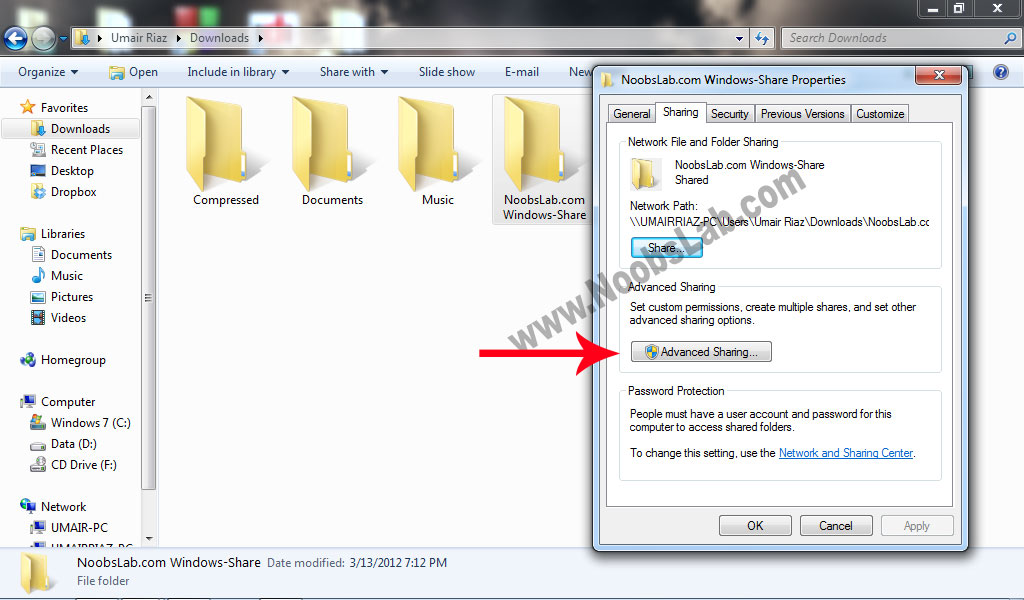
Select your Username or Everyone, I chose my username cause I want sharing restrictions.

ubuntu samba

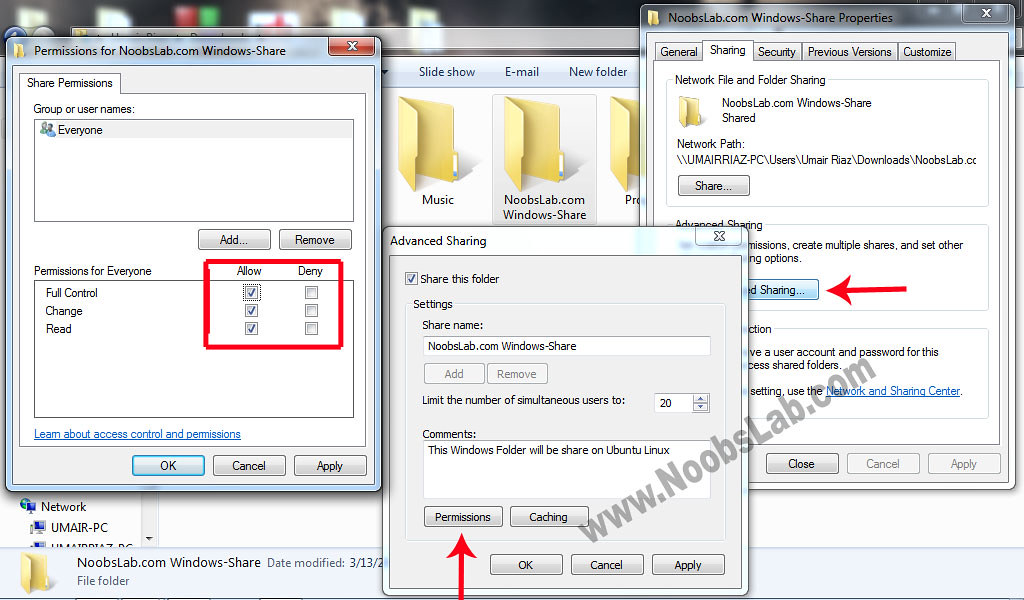
Now click on 'Permissions' button and select options as you want.

samba

Now it's time to check your network ip, open Command prompt or go to 'Run' type 'cmd'.
In Windows Command Prompt write following command to know your local network ip.(See Picture Below)
  • ipconfig
Note your IP Address.

linux samba

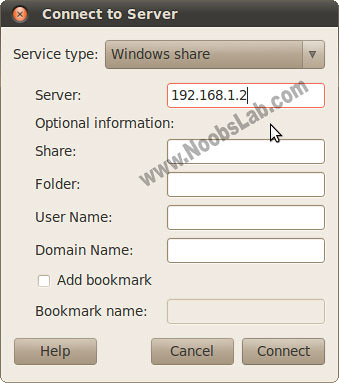
Now go to Ubuntu, Open File Browser>File Menu > 'Connect to Server'

install samba

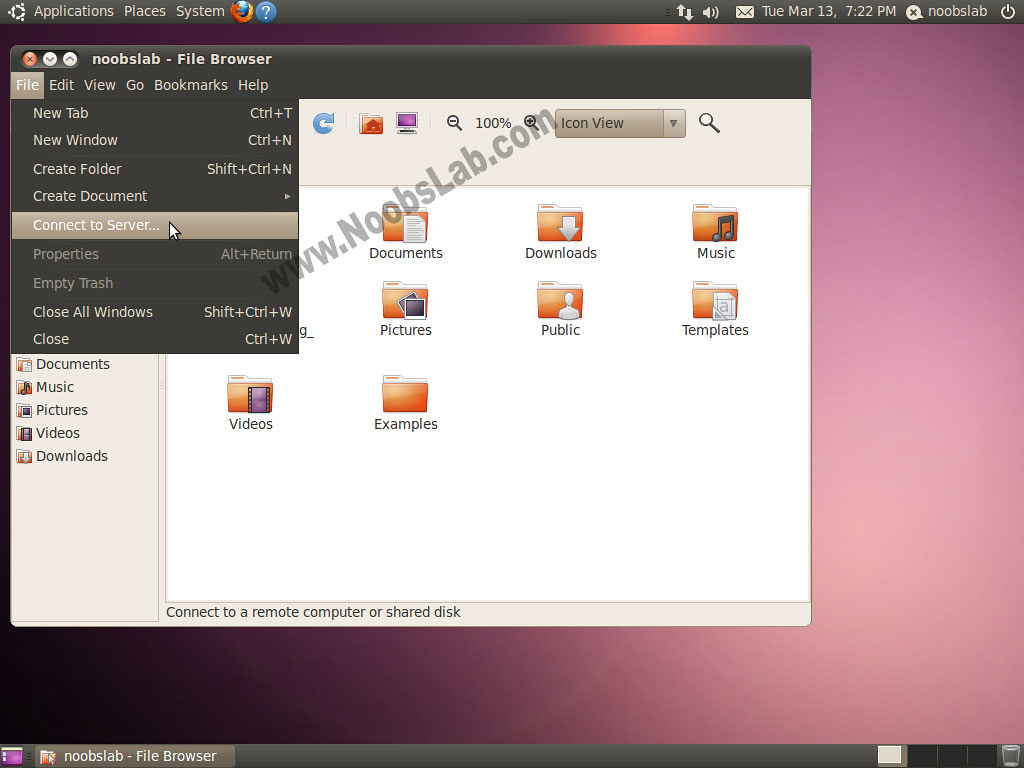
Select 'Windows Share' in Service type and Enter Windows IP Address in 'Server' than click on 'Connect'

samba

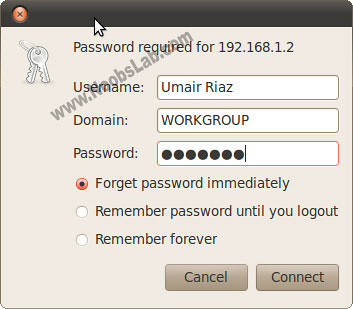
Enter your Windows Selected Username and Password, than click on 'Connect'. (Not Samba username Password)

samba

After connect you'll see folders, open your shared drive/folder and enter Windows username and password again. (Not Samba username and password)

samba

Here sharing is accessed, You can write/delete/modify whatever you want to do (It's up to your permission implementations).

samba share
That's it. Enjoy 

UNIX Introduction


What is UNIX?

UNIX® License PlateUNIX is an operating system which was first developed in the 1960s, and has been under constant development ever since. By operating system, we mean the suite of programs which make the computer work. It is a stable, multi-user, multi-tasking system for servers, desktops and laptops.
UNIX systems also have a graphical user interface (GUI) similar to Microsoft Windows which provides an easy to use environment. However, knowledge of UNIX is required for operations which aren't covered by a graphical program, or for when there is no windows interface available, for example, in a telnet session.

Types of UNIX

The Linux PenguinThere are many different versions of UNIX, although they share common similarities. The most popular varieties of UNIX are Sun Solaris, GNU/Linux, and MacOS X.
Here in the School, we use Solaris on our servers and workstations, and Fedora Linux on the servers and desktop PCs.

The UNIX operating system

The UNIX operating system is made up of three parts; the kernel, the shell and the programs.

The kernel

The kernel of UNIX is the hub of the operating system: it allocates time and memory to programs and handles the filestore and communications in response to system calls.
As an illustration of the way that the shell and the kernel work together, suppose a user types rm myfile (which has the effect of removing the filemyfile). The shell searches the filestore for the file containing the program rm, and then requests the kernel, through system calls, to execute the program rm on myfile. When the process rm myfile has finished running, the shell then returns the UNIX prompt % to the user, indicating that it is waiting for further commands.

The shell

The shell acts as an interface between the user and the kernel. When a user logs in, the login program checks the username and password, and then starts another program called the shell. The shell is a command line interpreter (CLI). It interprets the commands the user types in and arranges for them to be carried out. The commands are themselves programs: when they terminate, the shell gives the user another prompt (% on our systems).
The adept user can customise his/her own shell, and users can use different shells on the same machine. Staff and students in the school have thetcsh shell by default.
The tcsh shell has certain features to help the user inputting commands.
Filename Completion - By typing part of the name of a command, filename or directory and pressing the [Tab] key, the tcsh shell will complete the rest of the name automatically. If the shell finds more than one name beginning with those letters you have typed, it will beep, prompting you to type a few more letters before pressing the tab key again.
History - The shell keeps a list of the commands you have typed in. If you need to repeat a command, use the cursor keys to scroll up and down the list or type history for a list of previous commands.

Files and processes

Everything in UNIX is either a file or a process.
A process is an executing program identified by a unique PID (process identifier).
A file is a collection of data. They are created by users using text editors, running compilers etc.
Examples of files:
  • a document (report, essay etc.)
  • the text of a program written in some high-level programming language
  • instructions comprehensible directly to the machine and incomprehensible to a casual user, for example, a collection of binary digits (an executable or binary file);
  • a directory, containing information about its contents, which may be a mixture of other directories (subdirectories) and ordinary files.

The Directory Structure

All the files are grouped together in the directory structure. The file-system is arranged in a hierarchical structure, like an inverted tree. The top of the hierarchy is traditionally called root (written as a slash / )
Unix File Structure
In the diagram above, we see that the home directory of the undergraduate student "ee51vn" contains two sub-directories (docs and pics) and a file called report.doc.
The full path to the file report.doc is "/home/its/ug1/ee51vn/report.doc"

Starting an UNIX terminal

To open an UNIX terminal window, click on the "Terminal" icon from Applications/Accessories menus.
Gnome Menus

An UNIX Terminal window will then appear with a % prompt, waiting for you to start entering commands.
Unix Terminal window

INSTALL GNOME SHELL 3.4 AND EXTENSIONS FOR GNOME SHELL 3.4 IN UBUNTU 12.04 PRECISE PANGOLIN


Install Gnome Shell 3.4 and Extensions for Gnome Shell 3.4 in Ubuntu 12.04 Precise Pangolin

Gnome 3.4 is the second GNOME release since 3.0 back in April 2011. It brings a large number of improvements to the user experience, including many bug fixes and small enhancements. The result is a shinier, more polished, more reliable GNOME 3.
This release also contains some important new developments. Applications have been a major focus for recent design and development effort, and a host of applications have had significant updates for this release.
gnome shell 3.4

To Install Gnome Shell on Ubuntu 12.04 (Press Ctrl+Alt+T) and copy the following commands in the Terminal:
  • sudo apt-get update
  • sudo apt-get install gnome-shell gnome-tweak-tool

Here is complete Release Announcement of Gnome 3.4.


First Add NoobsLab PPA to install following Extensions:
  • sudo add-apt-repository ppa:noobslab/gnome

>> Install Weather Extension:
weather extension
Open Terminal and enter following command:
  • sudo apt-get install gnome-shell-extensions-weather
To get your Yahoo ID, go to http://weather.yahoo.com, enter your city/zip code and when you find it, look for the orange "RSS" icon on the right. Hovering this icon, you'll see your code - this is the WOEID.
    When you click on RSS icon, You'll see this URL in address bar
    For Example: http://weather.yahooapis.com/forecastrss?p=BUXX0005&u=f (See picture Below)
    The Red Color is "WOEID" code.

    gnome shell weather

    Copy and paste your Woeid id in settings.
    Now Restart your Gnome Shell (Press Alt+F2 and type: 'r') or Logout and Login back.


    >> Install Message Notifier Extension:

    open Terminal and enter following command:
    • sudo apt-get install gnome-shell-message-notifier


    >> Install System Monitor Extension: 
    gnome shell

    open Terminal and enter following command:
    • sudo apt-get install gnome-shell-system-monitor


    >> Install Bottom Panel, Shutdown, Panel Favorites, Application Menu, Clock, Workspace Extension: 

    Bottom Panel Extension
    gnome shell

    Shutdown Menu Extension
    gnome shell

    Panel Favorites Extension
    gnome shell

    Applications Menu Extension
    gnome shell

    Move clock Extension
    gnome shell

    Static Workspace Extension
    gnome shell

    open Terminal and enter following command:
    • sudo apt-get install shell-extensions3.4


    >> Install Gnome Shell Official Extensions:

    In this extension you can find User-Theme Extension, with this extension you can enable themes in Gnome Shell 3.4.
    gnome shell themes

    Themes Enabled 
    gnome shell 3.4 themes

    Also you will get other Extensions: Native Window Placement, Alternative Status Menu, Alternative Tab, User Themes, Workspace Indicator, Dock, Places Status Indicator, Auto Move Windows, System Monitor, Gajim IM Integration, Removable Drive Menu, WindowNavigator, Applications Menu Extension.

    Enter following command to Install Official Gnome Shell 3.4 Extensions:
    • sudo apt-get install gnome-shell-extensions
    After Installation Press Alt+F2 and type 'r' to restart Gnome Shell, or just logout and login back. Open Gnome Tweak Tool to change/install shell Themes.

    Also Checkout Important Things to do After Install of Ubuntu 12.04

    That's it, Enjoy 

    INSTALL MINTU THEMES ON UBUNTU/LINUX MINT (GTK3 + GNOME SHELL)


    Install Mintu Themes on Ubuntu 12.04/11.10/Linux Mint (GTK3 + Gnome Shell)

    Hani Ahmed shared his Mintu theme with NoobsLab. So today bring Mintu Theme for you by Hani Ahmed. Also check here huge Themes Collection.

    You can use these Tools to change theme and icons: Gnome Tweak ToolUbuntu Tweak

    Mintu Male Version
    Ubuntu themes

    Mintu Female Version
    Ubuntu themes

    Mint Gnome Shell Version (Male + Female)
    Ubuntu themes

    Theme tested on Ubuntu 12.04 Precise Pangolin with GTK 3 + Gnome Shell 3.4.1

    To Install Mintu-Male Theme on Ubuntu/Linux Mint (Press Ctrl+Alt+T) and copy the following commands in the Terminal:
    • mkdir ~/.themes
    • wget -O Mintu-male.zip http://dl.dropbox.com/u/53319850/NoobsLab.com/themes/Mintu-male.zip
    • unzip Mintu-male.zip -d ~/.themes
    • sudo rm Mintu-male.zip
    To Install Mintu-Female Theme on Ubuntu/Linux Mint (Press Ctrl+Alt+T) and copy the following commands in the Terminal:
    • mkdir ~/.themes
    • wget -O Mintu-female.zip http://dl.dropbox.com/u/53319850/NoobsLab.com/themes/Mintu-female.zip
    • unzip Mintu-female.zip -d ~/.themes
    • sudo rm Mintu-female.zip
    That's it, Enjoy

    INSTALL BLENDER 2.63 ON UBUNTU/LINUX MINT (NEW RELEASE


    Install Blender 2.63 on Ubuntu 12.04 Precise Pangolin/11.10 Oneiric Ocelot/11.04 Natty/10.10 Maverick/10.04 Lucid/Linux Mint

    Blender 2.63 has been release with 150 bugs fixed since it last release, it's available in ppa:cheleb/blender-svn and ready install it through them. this version is available for Ubuntu 10.04 (Lucid) until Ubuntu 12.04 (Precise).
    blender

    Popular Features:
    • Cycles Render Engine
    • Motion Tracking
    • UV Tools
    • "Carve" Booleans
    • Remesh modifier
    • Game Engine
    • Collada
    • Python API
    • More Features.

    To install Blender in Ubuntu/Linux Mint open Terminal (Press Ctrl+Alt+T) and copy the following commands in the terminal:
    • sudo add-apt-repository ppa:cheleb/blender-svn
    • sudo apt-get update
    • sudo apt-get install blender
    Here is the log of Blender 2.63
    Here is the Home Page 

    INSTALL IMPORTANT LENSES IN UBUNTU UNITY


    Install Best Important Lenses in Ubuntu Unity 12.04/11.10
    ubuntu unity lenses

    Some important lenses you must have in your Unity to make your Ubuntu Easier to use. These lenses make your Ubuntu Unity better and time saver. There are couple of best lenses you should have.

    So Now installation of lenses open Terminal (Press Ctrl+Alt+T) and copy the following PPA's command in Terminal:
    • sudo add-apt-repository ppa:jsevi83/unity
    • sudo add-apt-repository ppa:atareao/lenses
    • sudo apt-get update


    1: Graphic Design Lens

    The Graphic Design Lens is a veritable paintbox of inspiration having been designed to assist designers in finding resources to aid in their creativity.
    Using it is simple: enter a keyword into the search field and the Lens will return designs and project ideas from Dribble; swatches from ColourLovers; icons from Iconfinder service; and GIMP brushes from DeviantArt.
    The filter pane lets you narrow searches down to specific assets, whilst clicking on a specific result tile will download/open up the resource in a relevant app (i.e. GIMP brush opens in GIMP).
    • sudo apt-get install unity-scope-colourlovers


    2: Contacts Lens

    Since getting an Android phone my ‘address book’ lives on Google’s servers as part of my Google account. Among-st the various pluses this offers me is that, rather than fire up GMail to find a contact, I can use this ‘Contacts Lens’ to search my contact details directly from my desktop.
    It doesn’t do anything revolutionary; you enter a name and the Google Contacts Scope powering the lens searches through your contacts until it finds a match (or matches).
    Clicking on a result opens a mini contacts window so you can get the information you’re after, or edit what’s already there.
    • sudo apt-get install scope-contacts-google
    • sudo apt-get install lens-contacts


    3: Tomboy Lens 

    Tomboy is a crutch of my creativity. I use it to jot down ideas, brainstorms, bad puns, shopping lists, contact details, etc. With so many notes covering so many different things it’s easy for me to loose track of what is written and where.
    It’s this situation that the Tomboy Lens fixes. As well as displaying my most recent notes it also lets me search through the text of  all my saved notes using the search bar. A killer feature made super easy to get at.
    If you’re an avid Tomboy user then be sure to put installing this lens on your ‘to do’ list.
    • sudo add-apt-repository ppa:remi.rerolle/unity-lens-tomboy
    • sudo apt-get update
    • sudo apt-get install unity-lens-tomboy


    4: Flickr/Photos Lens

    Whether I’m in need of a photo for a blog post, a new wallpaper for desktop, or interested to see what images are turned for a random tag, I turn to Flickr.
    With that in mind it won’t shock you to learn that I’m a big fan of the Flickr Scope/Photo Lens set. It lets me search Flickr without having to leave my desktop. The Scope does requires authorization before it can access photos, both your own and those publicly available, but this minor inconvenience is well worth the convenience the lens lends to Unity.
    • sudo apt-get install unity-scope-flickr


    5: YouTube Lens

    Say hello to video-flavored procrastination tool as all of the above tasks are possible using the Video Lens from developers Ateraeo. It making finding videos on YouTube stupidly easy from the desktop.
    Video results can be sorted based on rating, relevance, upload date, etc. A configuration tool is included that lets you choose which application videos play back in. Options include VLC, YouTube app MiniTube, or the humble web browser.
    • sudo apt-get install lens-video
    • sudo apt-get install scope-youtube


    6: Cities Scope Lens

    Short of a dedicated dedicated ‘weather lens’ is the ‘Cities Scope’.
    Once installed, you can enter a city and country into the Dash search bar and have the current time, weather conditions, and link to Google Map for the location returned in the Dash under the ‘Utilities’ heading.
    • sudo apt-get install unity-scope-cities


    7: Gwibber Lens

    Twitter. You either get it or you don’t. And if you do then there’s a good chance that you’re using Ubuntu’s default social client ‘Gwibber’ to post and read updates.
    The official Gwibber Lens compliments the desktop app perfectly. It shows messages, replies, images, etc from your stream – all of which can be searched through and filtered. If you’re using more than one account you can also filter messages on a per-account basis.
    If there’s a drawback to using the lens it’s that it’s slow. Often frustratingly slow. I found it to lag a good 15 minutes behind what was actually going on in my Twitter stream. I also dislike the fact that clicking on a tweet/item opens it up in the browser rather than Gwibber.
    But the usefulness (read: search) offered by the elegant interface more than stands on its own merits.
    • sudo apt-get install unity-lens-gwibber


    8: Spotify Scope Lens

    There are a slew of additional scopes – ‘search backends’ – for Ubuntu’s Music Lens: Clementine, Grooveshark, and Banshee to name but three.
    But my favorite music-lens addition is the ‘Spotify Scope’.
    With a simple artist or track title search it ransacks Spotify’s millions-strong library and gives me a bunch of playable results (which are denoted by the Spotify logo in the bottom right-hand corner).
    Clicking on a result immediately opens the track or album in Spotify for Linux for playback. Certainly sounds good to me.
    • sudo apt-get install unity-scope-spotify


    9: Books Lens

    As a Kindle user I download and read a lot of books – the majority of which I don’t get from Amazon’s Kindle store.
    I’m an avid fan of late Victorian/early 1900′s fiction. H.G. Wells, Olaf Staple-don, Jules Verne, Stefan Zweig and the majority of works by these authors are long-since out of copyright and freely downloadable online.
    The Book Lens makes searching available to download freely (and legally) online, as well as sifting through any local copies you have, a snap.
    Enter a title or author, narrow your search down to a specific source via the filter pane, and click on a result you want to be taken to page where you can download it.
    Although the Lens is capable of searching and showing locally-stored . PDFs located in the Documents folder it doesn't detect .mobi or .epub files – a sad oversight in my opinion as .epub is the definitive and most widely used eBook format.
    • sudo apt-get install unity-lens-books
    That's it